
Plain-English Overview
The HC-SR04 measures distance using echoes. It sends a short burst of sound that humans cannot hear, then waits for the sound to bounce off an object and return.
Your ESP32 measures how long the echo took. Sound moves through air at a known speed, so the code converts time into distance. If the echo returns quickly, the object is close. If it takes longer, the object is farther away.
Use it for simple distance experiments and robots. Do not use it where soft fabric, angled surfaces, wind, rain, or tiny objects must be measured accurately.
Where You Use It
- Robot obstacle detection
- Parking distance indicator
- Tank level experiment
- Hands-free trigger
- Doorway people counter
- Classroom echo demo
- Trash-bin fill monitor
- Distance alarm
Quick Facts
- Range About 2 cm to 400 cm
- Signal TRIG output and ECHO input
- Power 5 V module power
- ESP32 safety Level shift ECHO to 3.3 V
- Best surface Flat and hard
- Timing Microsecond pulse measurement
How It Works
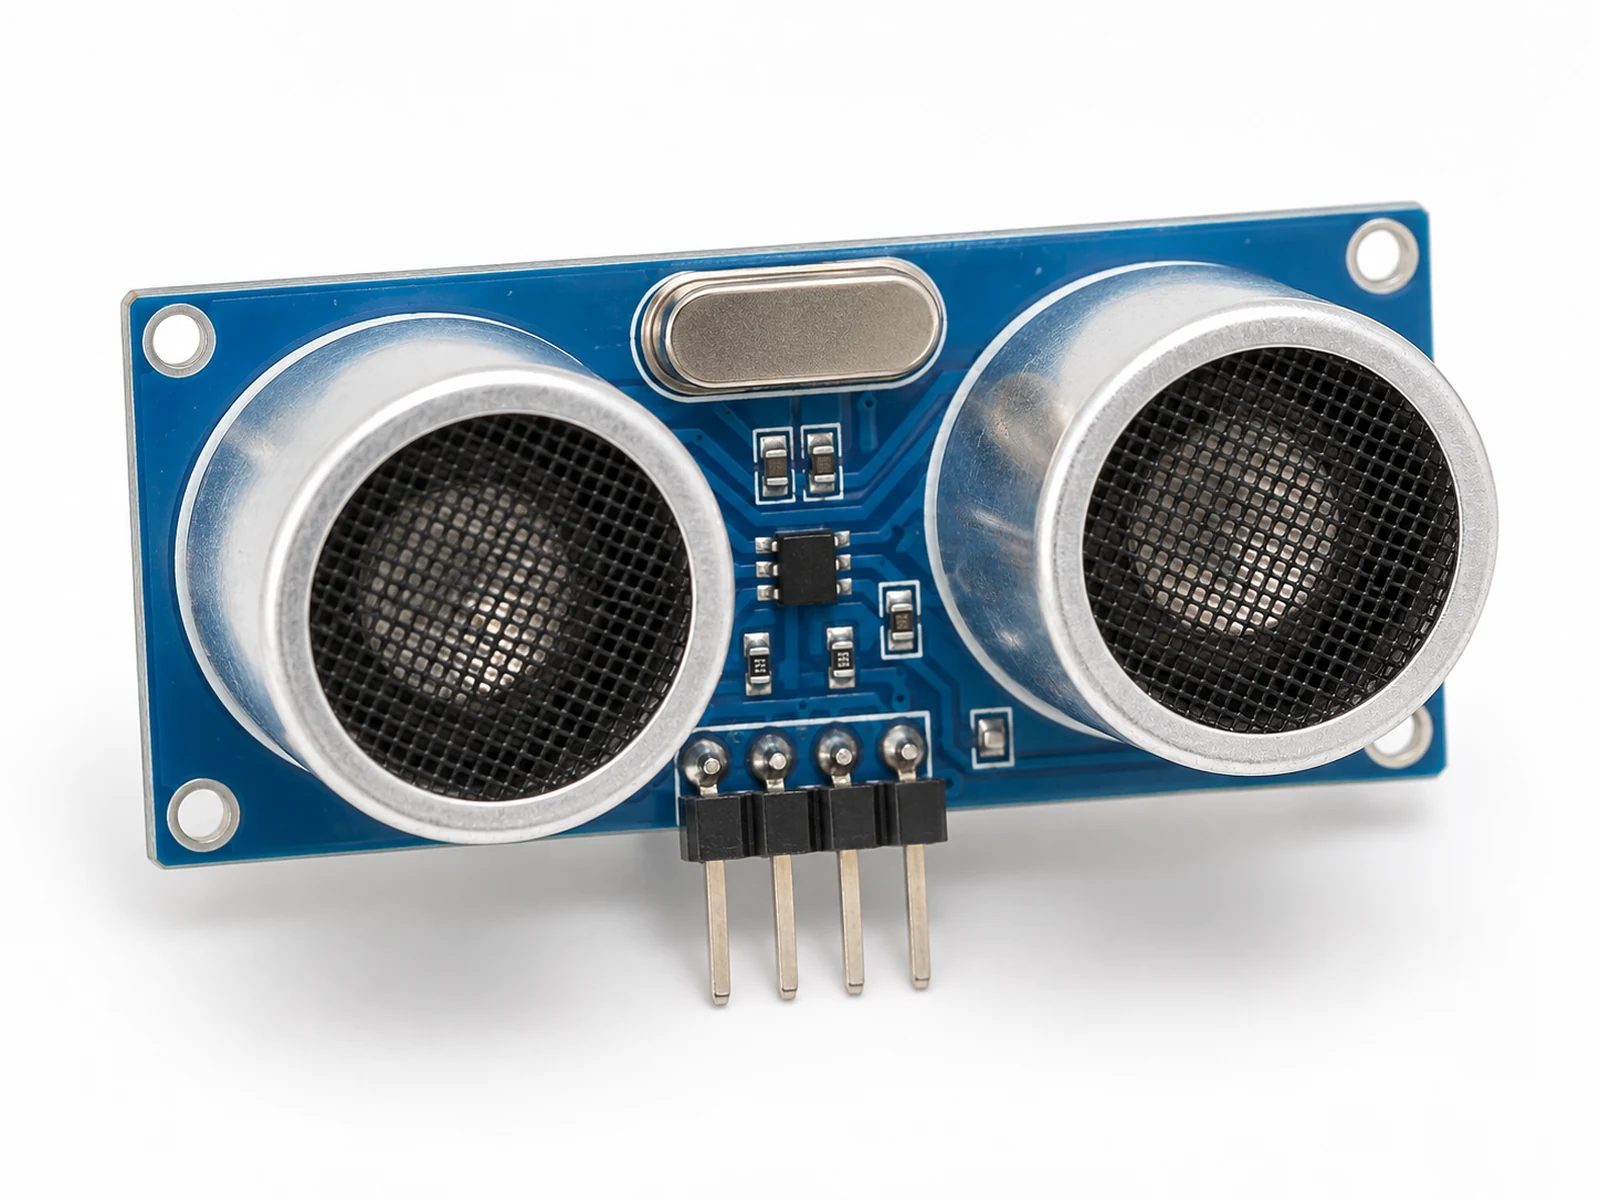
The sensor has two round cans. One is an ultrasonic transmitter and the other is a receiver. When the ESP32 sends a 10 microsecond pulse to TRIG, the module emits a short burst near 40 kHz.
After transmitting, the ECHO pin goes HIGH. It stays HIGH until the reflected sound returns or the module times out. The ESP32 measures that HIGH time in microseconds.
Distance equals speed times time, but the sound travels to the object and back. That is why code divides by two. At room temperature, sound travels about 0.0343 centimeters per microsecond, so distance in cm is roughly duration * 0.0343 / 2.
The ECHO pin on many HC-SR04 modules is 5 V. ESP32 input pins are 3.3 V only, so use a voltage divider or level shifter. This one detail is the difference between a safe beginner build and a damaged board.
Technical Specifications
Arduino library: Built-in Arduino timing with pulseIn
| Specification | Value | Why it matters |
|---|---|---|
| Supply voltage | 5 V typical | Common modules need 5 V for the ultrasonic transmitter. |
| ESP32 input safety | ECHO must be reduced to 3.3 V | Protects the ESP32 GPIO from 5 V logic. |
| Range | About 2 cm to 400 cm | Objects too close or too far may produce invalid readings. |
| Best range | Roughly 5 cm to 200 cm | More reliable for beginner robots and classroom tests. |
| Accuracy | About 3 mm under good conditions | Real accuracy depends on angle, surface, and temperature. |
| Ultrasonic frequency | Around 40 kHz | Above human hearing, but still affected by surfaces and air. |
| Trigger pulse | 10 microseconds HIGH | Starts one distance measurement. |
| Echo output | Pulse width proportional to distance | The ESP32 measures this time to calculate distance. |
| Field of view | Roughly 15 degrees | Wide enough to detect nearby obstacles but not a camera-like beam. |
| Update interval | Use 50 ms or slower | Gives echoes time to fade before the next ping. |
| Poor targets | Cloth, foam, angled surfaces, small objects | These absorb or deflect sound away from the receiver. |
Pinout
- VCC Power input 5 V Power the module from 5 V unless you have a special 3.3 V version.
- TRIG Trigger input ESP32 GPIO5 ESP32 output; 3.3 V HIGH is normally accepted by the module.
- ECHO Echo output ESP32 GPIO18 through level shifter/divider Do not connect 5 V ECHO directly to ESP32.
- GND Ground reference ESP32 GND Common ground is required for correct signal timing.
Wiring Diagram
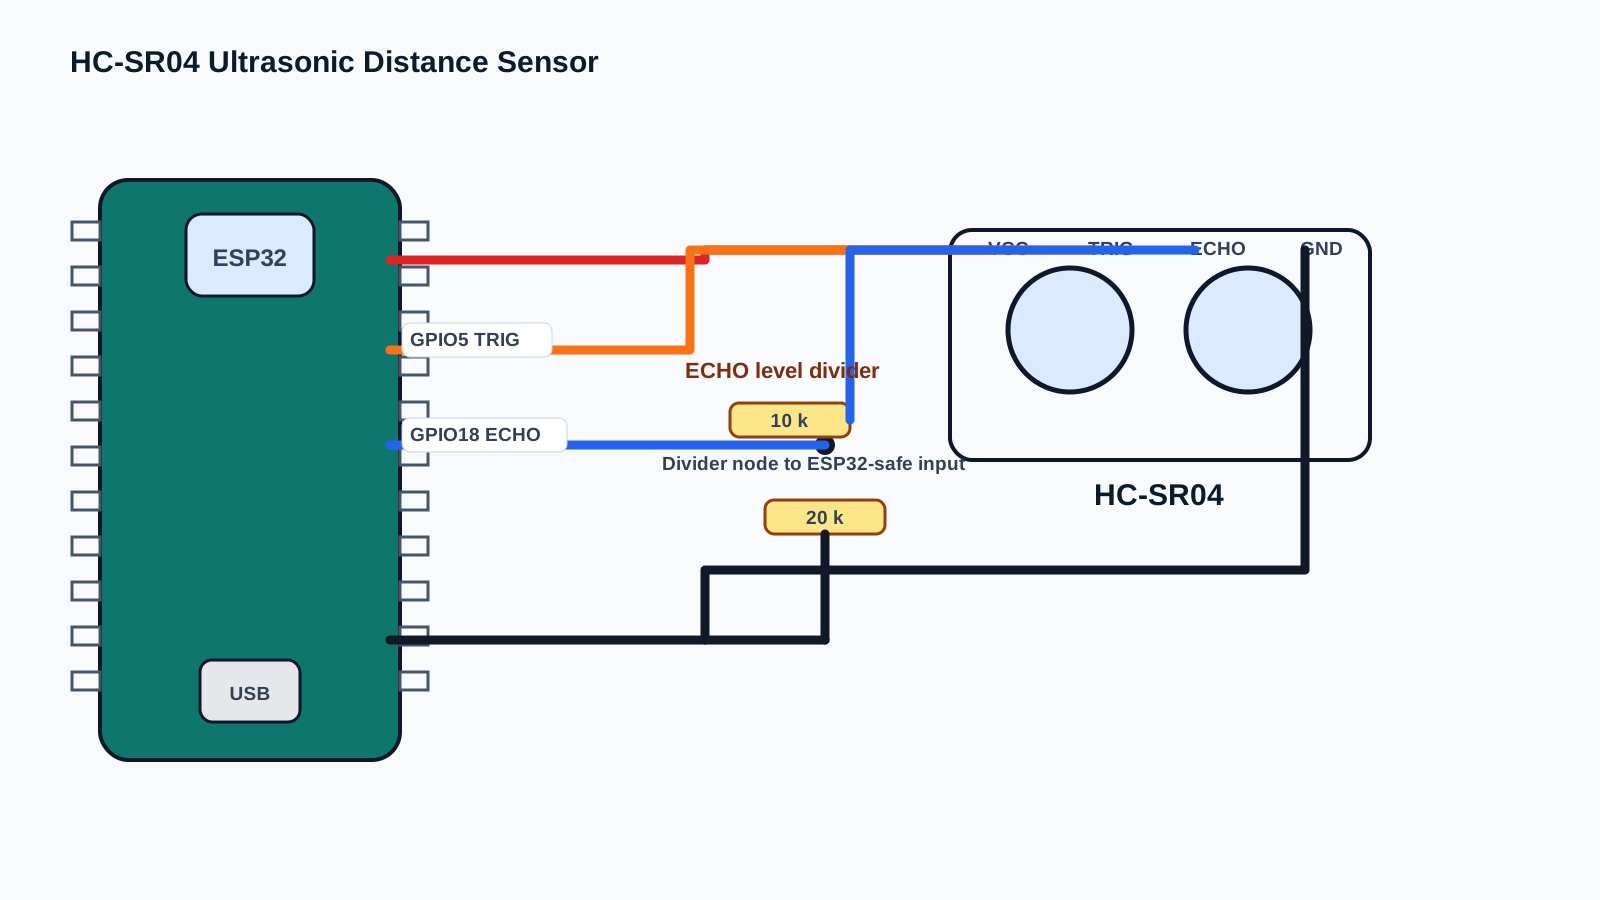
The HC-SR04 uses 5 V power but the ESP32 uses 3.3 V logic. TRIG from ESP32 to sensor is usually safe, but ECHO from sensor to ESP32 must be level shifted.
This site's distance-monitor and parking-sensor projects use a 10 kOhm / 20 kOhm voltage divider on ECHO before GPIO18. A proper logic level shifter is also fine. Do not connect a 5 V ECHO signal directly to an ESP32 GPIO.
| HC-SR04 Pin | ESP32 Connection | Notes |
|---|---|---|
| VCC | 5 V / VIN | Power for common HC-SR04 modules. Confirm your ESP32 board's 5 V/VIN label before wiring. |
| GND | GND | Shared ground is required for TRIG and ECHO timing to make sense. |
| TRIG | GPIO5 | ESP32 output. The sketch sends a 10 microsecond HIGH pulse to start one measurement. |
| ECHO | GPIO18 via 10 kOhm / 20 kOhm divider | ECHO can be 5 V on common modules. Reduce it to ESP32-safe 3.3 V logic before GPIO18. |
-
1
Unplug USB before wiring.
-
2
Connect HC-SR04 VCC to 5 V or VIN on the ESP32 board.
-
3
Connect HC-SR04 GND to ESP32 GND.
-
4
Connect TRIG to ESP32 GPIO5.
-
5
Connect ECHO through the 10 kOhm / 20 kOhm divider used by this site's distance projects, or through a proper level shifter.
-
6
Connect the divided or shifted ECHO signal to ESP32 GPIO18.
-
7
Point the sensor at a flat object at least 5 cm away.
-
8
Upload the code and open Serial Monitor at 115200 baud.
Code Examples
Use the same wiring with Arduino IDE, PlatformIO, or ESP-IDF. Start with Arduino, then graduate when you need a larger project structure.
#define TRIG_PIN 5
#define ECHO_PIN 18

const unsigned long ECHO_TIMEOUT_US = 30000;
const float SOUND_CM_PER_US = 0.0343;

void setup() {
  Serial.begin(115200);
  pinMode(TRIG_PIN, OUTPUT);
  pinMode(ECHO_PIN, INPUT);
  digitalWrite(TRIG_PIN, LOW);
  Serial.println("HC-SR04 ESP32 distance test");
}

float readDistanceCm() {
  digitalWrite(TRIG_PIN, LOW);
  delayMicroseconds(2);
  digitalWrite(TRIG_PIN, HIGH);
  delayMicroseconds(10);
  digitalWrite(TRIG_PIN, LOW);

  unsigned long duration = pulseIn(ECHO_PIN, HIGH, ECHO_TIMEOUT_US);
  if (duration == 0) {
    return -1.0;
  }

  return (duration * SOUND_CM_PER_US) / 2.0;
}

void loop() {
  float distanceCm = readDistanceCm();

  if (distanceCm < 2 || distanceCm > 400) {
    Serial.println("No reliable echo. Check target distance, angle, and wiring.");
  } else {
    Serial.print("Distance: ");
    Serial.print(distanceCm, 1);
    Serial.println(" cm");
  }

  delay(100);
}#include <Arduino.h>
#define TRIG_PIN 5
#define ECHO_PIN 18
const unsigned long ECHO_TIMEOUT_US = 30000;
const float SOUND_CM_PER_US = 0.0343;
void setup() {
Serial.begin(115200);
pinMode(TRIG_PIN, OUTPUT);
pinMode(ECHO_PIN, INPUT);
digitalWrite(TRIG_PIN, LOW);
Serial.println("HC-SR04 ESP32 distance test");
}
float readDistanceCm() {
digitalWrite(TRIG_PIN, LOW);
delayMicroseconds(2);
digitalWrite(TRIG_PIN, HIGH);
delayMicroseconds(10);
digitalWrite(TRIG_PIN, LOW);
unsigned long duration = pulseIn(ECHO_PIN, HIGH, ECHO_TIMEOUT_US);
if (duration == 0) {
return -1.0;
}
return (duration * SOUND_CM_PER_US) / 2.0;
}
void loop() {
float distanceCm = readDistanceCm();
if (distanceCm < 2 || distanceCm > 400) {
Serial.println("No reliable echo. Check target distance, angle, and wiring.");
} else {
Serial.print("Distance: ");
Serial.print(distanceCm, 1);
Serial.println(" cm");
}
delay(100);
}// ESP-IDF starter structure for this component.
// Keep the wiring from the pinout section, then move the read/write logic into app_main().
#include <stdio.h>
#include "freertos/FreeRTOS.h"
#include "freertos/task.h"
void app_main(void) {
printf("HC-SR04 Ultrasonic Distance Sensor ready\n");
while (true) {
// Add component read/write code here.
vTaskDelay(pdMS_TO_TICKS(1000));
}
}TRIG is an ESP32 output. ECHO is an ESP32 input after level shifting. The timeout in pulseIn() prevents the sketch from waiting forever when no echo returns.
The code rejects distances outside the practical range so beginners do not trust impossible numbers. For robots, take several readings and use the median or average to reduce single bad echoes.
Expected Output
With a flat object in front of the sensor, Serial Monitor prints values such as Distance: 24.7 cm. Move your hand closer and the number decreases. Move it farther away and the number increases. If the object is too close, too soft, too angled, or missing, the sketch prints a no reliable echo message.
Common Mistakes
- Connecting ECHO directly to ESP32 without level shifting.
- Forgetting common ground.
- Measuring objects closer than 2 cm.
- Pointing the sensor at cloth or angled surfaces.
- Using delay too short between pings.
- Expecting perfect readings outdoors in wind.
- Powering the module from weak 3.3 V.
- Swapping TRIG and ECHO.
- Using pulseIn without timeout.
- Mounting the sensor where robot vibration changes its angle.
Troubleshooting
| Problem | Possible cause | Solution |
|---|---|---|
| Always reads 0 or timeout | No echo, wrong wiring, or target out of range. | Check TRIG/ECHO pins, common GND, and place a flat object 20 cm away. |
| ESP32 input damaged or unstable | ECHO connected directly at 5 V. | Use a voltage divider or level shifter before connecting ECHO. |
| Distance is double or half | Formula forgot the divide-by-two or used wrong sound constant. | Use duration * 0.0343 / 2 for centimeters. |
| Numbers jump wildly | Object angle, soft target, vibration, or electrical noise. | Aim at a flat hard surface and average several readings. |
| Short distances fail | Object is inside the blind zone. | Keep targets at least 2 to 5 cm away. |
| Long distances fail | Echo too weak or timeout too short. | Use larger flat target and timeout around 30000 us. |
| Works on Arduino Uno but not ESP32 | Voltage-level assumptions differ. | Level shift ECHO and confirm ESP32 GPIO numbers. |
| Robot sees obstacles late | Sensor angle or update interval is wrong. | Mount level and read every 50-100 ms. |
| False detections from floor | Sensor points downward. | Tilt sensor slightly up or adjust mounting height. |
| No readings after adding motor | Motor noise or power dip. | Use separate motor power and common ground. |
| Serial gibberish | Wrong baud rate. | Set Serial Monitor to 115200. |
| Only works when USB connected | 5 V supply missing on external power. | Provide stable 5 V to VCC and common GND. |
| Outdoor readings poor | Wind and soft targets scatter sound. | Use infrared, LiDAR, or waterproof ultrasonic module for outdoor use. |
| Multiple sensors interfere | Pings overlap. | Trigger sensors one at a time with delay between pings. |
| Tank level reading wrong | Foam or angled liquid surface absorbs sound. | Use stilling tube or different level sensor. |
Related Guides
Related Projects
FAQ
It measures distance to objects by timing ultrasonic echoes.
No. ECHO is often 5 V and should be level shifted to 3.3 V.
Usually no. The ESP32 3.3 V HIGH is normally enough for the trigger input.
GPIO5 for TRIG and GPIO18 for ECHO are good beginner choices.
Sound travels to the object and back, so the measured time covers twice the distance.
About 2 cm, but 5 cm or more is more reliable for beginners.
About 400 cm under good conditions, less for small or soft targets.
Yes, but clothing and angle can make readings inconsistent.
Sometimes, if the surface is calm and the sensor is protected from moisture.
Standard HC-SR04 is not waterproof.
Surface angle, soft material, vibration, and power noise all affect echoes.
Yes, trigger them one at a time to avoid echo interference.
Yes. Sound speed changes with temperature, but beginner projects often ignore the small error.
Yes, but built-in pulseIn is enough for first ESP32 lessons.
The pulse timed out, wiring is wrong, or no valid echo returned.
Usually not reliably because reflections occur at the glass surface.
Poorly. Fabric absorbs sound.
Most HC-SR04 modules need 5 V power.
Yes when USB supplies VIN/5V, but confirm your board pin labels.
It is good for learning and rough distance, not precision metrology.
Time of flight is the travel time of the ultrasonic sound burst from the sensor to the object and back.
The echo pulse is the HIGH signal whose length tells the ESP32 how long the sound took to return.
Use 5 V module power, a level-shifted ECHO pin, and a flat book or wall as the first target.
Stop and unplug if ECHO is wired directly to ESP32, the board heats up, or readings appear only after touching wires.
It links sound speed, pulse timing, voltage-level safety, and measurement uncertainty in one visible experiment.
Have students compare hard, soft, angled, close, and far targets while keeping wiring unchanged.
Take several measurements, reject impossible values, and average or median-filter the remaining readings.
Use distance thresholds to light an LED, update an OLED, or slow a beginner robot.
The pulse travels to the object and back, so the measured trip covers twice the one-way distance.
Many modules output 5 V on ECHO, while ESP32 GPIO inputs must stay at 3.3 V logic.
HC-SR04 Ultrasonic Distance Sensor is a sensors part used with the ESP32. Learn its job first, then connect power, ground, and signal pins exactly as the wiring table shows.
A signal pin is the wire that carries information between the ESP32 and the component. It may be digital, analog, I2C, SPI, PWM, or another protocol depending on the part.
For a beginner ESP32 lesson, this component is suitable when an adult checks the wiring, keeps the project at low voltage, and unplugs USB before moving jumper wires.
Watch for reversed power pins, loose jumper wires, and children touching the circuit while it is powered. Most beginner ESP32 mistakes are wiring mistakes, not broken parts.
Use HC-SR04 Ultrasonic Distance Sensor to connect one visible hardware behavior to one software concept. Ask students to predict the reading or output first, then test it on real hardware.
Assess whether students can explain the wiring, identify the ESP32 pins used, run the example, describe the expected output, and troubleshoot one intentional mistake.
Change one variable at a time: move to another valid GPIO, adjust the timing, display the value on an OLED, or combine the component with a related project.
Disconnect one wire, predict the failure, observe the output, then explain why the failure happened before reconnecting the circuit.
Unplug USB power first. Then check the pin labels, voltage level, and ground connection before powering the ESP32 again.
Common ground gives the ESP32 and the component the same voltage reference. Without it, signal readings can be wrong or unstable.
Review, Testing, and References
Author: Abdul Mubeen and the ESP32 Engine editorial team. Last updated: 2026-08-22. Reviewed: wiring, code, beginner safety, and ESP32 compatibility. Educational level: Beginner.
Use this component page as an educational starting point. Check official documentation before using the part in production, high-current, outdoor, battery, or safety-critical hardware.
Downloads
HC-SR04 datasheet for timing, range, voltage, and mechanical notes.
Download Datasheet (PDF)