
Catch a Floating Pin in the Act
The Story
In Mission 02 your button behaved nicely because the code used INPUT_PULLUP. That one line quietly solved a real electronics problem: without a defined HIGH or LOW state, an ESP32 input can float.
A floating ESP32 GPIO is an input with no clear voltage driving it. When nothing drives the pin and no pull resistor is active, electrical noise can make digitalRead() appear to change randomly. The practical fix is to give the pin a default path to 3.3 V or GND using INPUT_PULLUP, INPUT_PULLDOWN on supported pins, or an external pull-up or pull-down resistor.
Now you will remove the safety net, leave an input unconnected, and watch Serial Monitor show why every button or sensor input needs a defined default state.
Explain Like I'm 12
Imagine asking a friend a yes-or-no question, but they are standing far away in a noisy room. You might hear yes, no, yes, no, even if they never answered.
A floating GPIO pin is like that. The ESP32 is listening, but the pin is not clearly connected to HIGH or LOW. Electrical noise becomes the answer.
Mission Goal
You will intentionally leave a GPIO input floating, watch the value change unpredictably, then understand why stable button circuits need a defined default state.
Estimated Time
18-22 min
Difficulty
Beginner
Prerequisites
Skills You'll Learn
- Explain what a digital input is
- Describe HIGH and LOW in ESP32 voltage terms
- Recognize a floating input pin
- Use Serial Monitor to observe random input values
- Understand why pull-up and pull-down resistors are needed
Components Required
- ESP32 DevKit boardThe GPIO input you will observe
- One jumper wireUsed as a test lead for GPIO27
- BreadboardOptional, but useful for keeping the jumper stable
- USB data cableFor upload and Serial Monitor
What Is a Floating ESP32 GPIO?
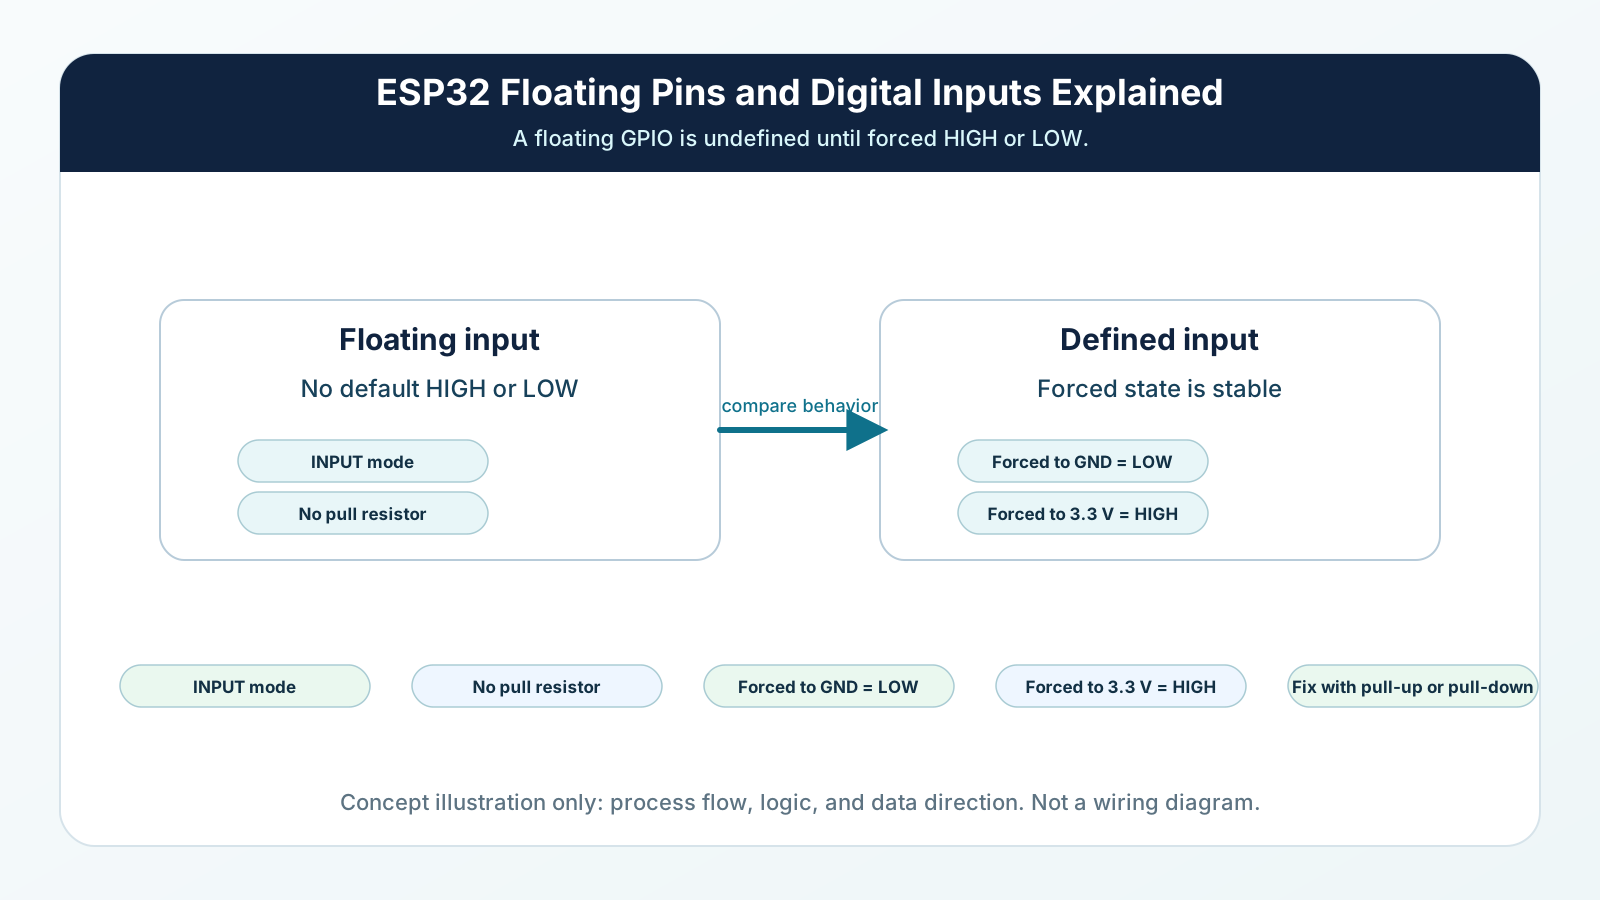
A digital input is a GPIO pin that the ESP32 reads instead of controls. In code, pinMode(pin, INPUT) tells the ESP32 to listen to the pin without enabling an internal pull-up or pull-down resistor.
That input is high impedance, so it draws very little current. If nothing externally drives the pin to a valid logic level, the voltage is undefined. The pin is floating.
ESP32 uses 3.3 V logic, but digitalRead() does not measure the exact voltage. LOW means the pin voltage is below the logic LOW threshold. HIGH means the pin voltage is above the logic HIGH threshold. A floating pin can wander between those regions, so digitalRead() may alternate between HIGH and LOW.
Noise, capacitive coupling, a long jumper wire, nearby electronics, or your hand can influence a floating GPIO. The important beginner trap is this: a pin that is not connected to HIGH or LOW is not automatically LOW. It is unknown until a circuit gives it a defined default state.
Engineering Explanation
Inside the ESP32, each GPIO input is connected to a tiny sensing circuit. That circuit has very high impedance, which means it does not draw much current from the outside world. High impedance is useful because sensors and buttons do not have to supply much current.
But high impedance also means the input is easy to influence when it is undriven. A nearby jumper wire, your finger, USB noise, Wi-Fi activity, static charge, or capacitive coupling from nearby electronics can move the pin voltage enough to cross a logic threshold. The ESP32 is not confused; it is reporting HIGH or LOW from a voltage that has not been forced to a stable value.
A stable digital input needs a defined path to either 3.3 V or GND. That path can come from a switch, an actively driven sensor output, INPUT_PULLUP, INPUT_PULLDOWN on a supported GPIO, an external pull-up, or an external pull-down. If a button is open when released, the default path must still exist or false presses can appear. Mission 03 explains the problem and demonstrates the unstable reading. Mission 04, ESP32 pull-up and pull-down resistors, teaches the wiring patterns that create the reliable default state.
Real-World Analogy
Think of a digital input like a door sensor in a quiet hallway. If the door is fully closed, the answer is clear. If the door is fully open, the answer is clear. But if the sensor wire is not connected to the door at all, the alarm system is just listening to a dangling wire. It may report open, closed, open, closed because the wire is picking up noise from the room.
A pull-up or pull-down resistor is like a gentle spring that keeps the door sensor in one default position until a real action moves it.
ESP32 Internal Pull-up and Pull-down Resistors
Arduino ESP32 supports INPUT_PULLUP and INPUT_PULLDOWN on GPIOs that provide those internal pull resistors. These modes are a convenient way to give an input a default state without adding a separate resistor.
For the original classic ESP32, GPIO34-GPIO39 are input-only and do not provide integrated pull-up or pull-down resistors. If you need a defined default state on one of those pins, use an external pull-up or pull-down resistor. Do not assume every ESP32 family member or board has identical GPIO behavior; check the board and chip documentation when choosing pins.
INPUT vs INPUT_PULLUP vs INPUT_PULLDOWN
| Mode | Internal Pull | Typical Default Behavior |
|---|---|---|
| INPUT | No internal pull resistor | Can float when no external circuit drives the pin |
| INPUT_PULLUP | Internal pull-up on supported GPIOs | Defaults HIGH until a button, switch, or circuit pulls the pin LOW |
| INPUT_PULLDOWN | Internal pull-down on supported GPIOs | Defaults LOW until a button, switch, or circuit drives the pin HIGH |
Wiring Diagram
Follow these steps in order. Unplug USB before you change any wires.
-
1
Unplug the ESP32 USB cable before placing the jumper.
-
2
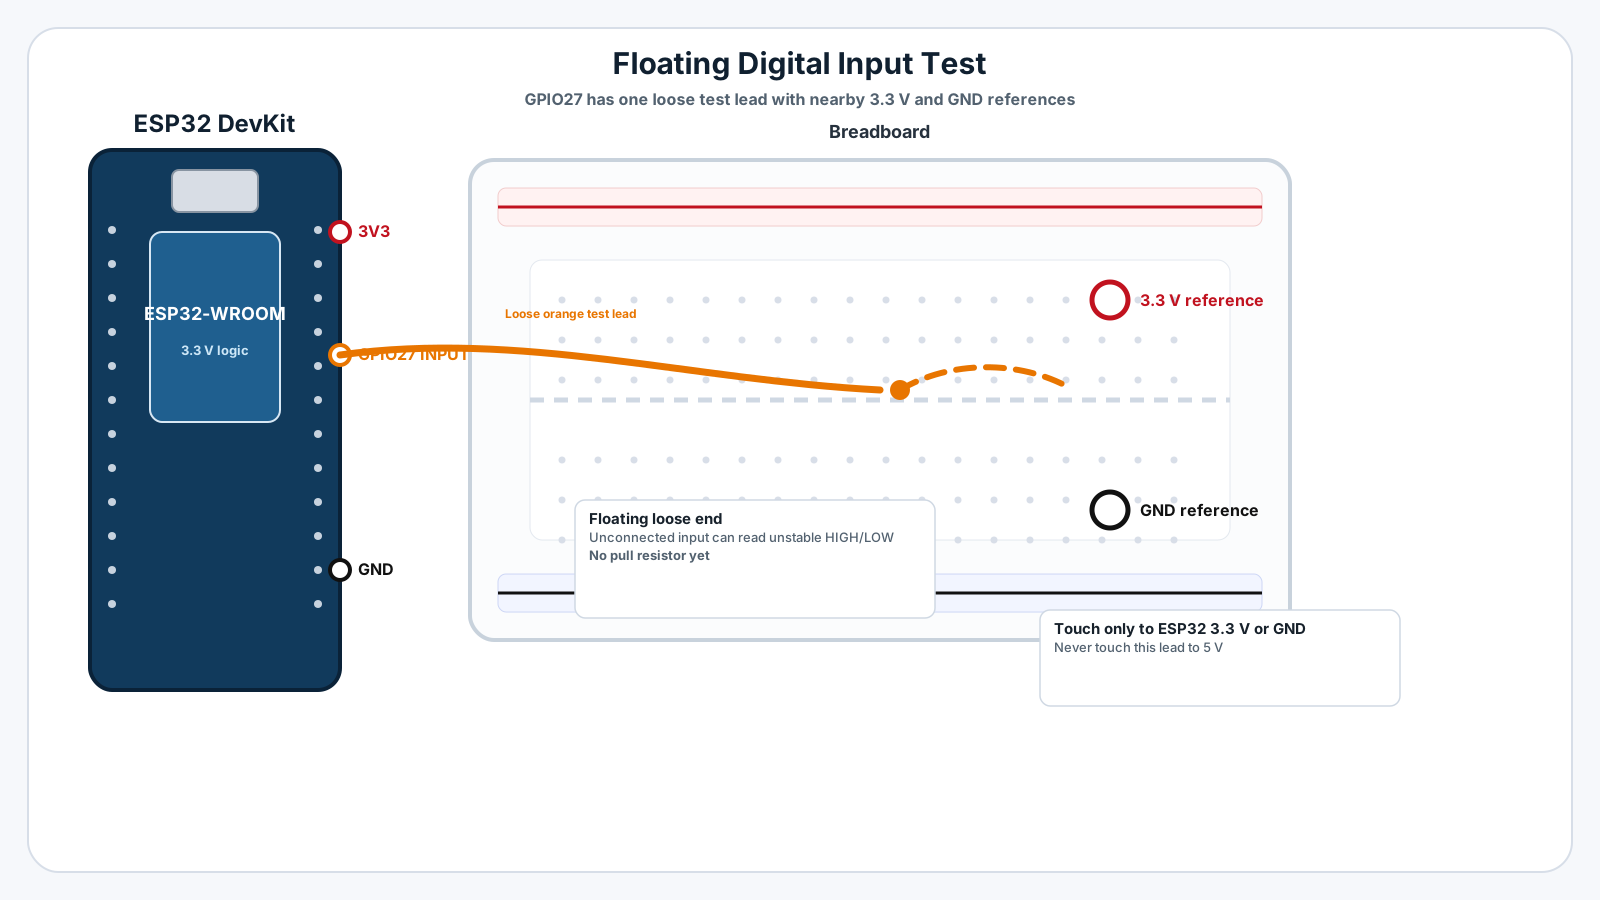
Connect one end of a jumper wire to ESP32 GPIO27.
-
3
Leave the other end of the jumper wire unconnected. This is the floating input test.
-
4
Plug in USB and upload the code.
-
5
Open Serial Monitor at 115200 baud.
-
6
Watch the printed input value while the jumper end floats in the air.
-
7
Briefly touch the loose jumper end to GND. The value should become LOW.
-
8
Briefly touch the loose jumper end to 3.3 V. The value should become HIGH.
-
9
Let go again and observe that the value may become unstable.
GPIO Table
| Signal | ESP32 Pin | Mode | Notes |
|---|---|---|---|
| Floating input test lead | GPIO27 | INPUT | Reads HIGH or LOW depending on the voltage on the loose jumper. |
| HIGH reference | 3.3 V | Power | Touch the jumper here briefly to force a HIGH reading. |
| LOW reference | GND | Ground | Touch the jumper here briefly to force a LOW reading. |
| Serial debug | USB | Serial | Prints the value at 115200 baud. |
Arduino Code
Copy this into Arduino IDE, then click Upload.
const int INPUT_PIN = 27;

int lastReading = -1;

void setup() {
  Serial.begin(115200);
  pinMode(INPUT_PIN, INPUT);

  Serial.println("Mission 03: Digital input and floating pin test");
  Serial.println("Leave GPIO27 floating, then touch it to GND or 3.3V.");
}

void loop() {
  int reading = digitalRead(INPUT_PIN);

  if (reading != lastReading) {
    if (reading == HIGH) {
      Serial.println("GPIO27 reads HIGH");
    } else {
      Serial.println("GPIO27 reads LOW");
    }

    lastReading = reading;
  }

  delay(50);
}- This sketch intentionally uses INPUT, not INPUT_PULLUP.
- GPIO27 is left floating at first so you can observe random values.
- The code prints only when the input changes, so the behavior is easier to see.
- Do not use this floating input pattern in real projects. It is only an experiment.
Line-by-line Explanation
- const int INPUT_PIN = 27; gives the input pin a clear name so the rest of the code is easier to read.
- int lastReading = -1; stores the previous input value. -1 is used because the first real reading will be HIGH or LOW.
- Serial.begin(115200); starts communication with Serial Monitor.
- pinMode(INPUT_PIN, INPUT); tells the ESP32 to listen to GPIO27 without enabling an internal pull-up or pull-down.
- digitalRead(INPUT_PIN); asks whether GPIO27 looks HIGH or LOW right now.
- if (reading != lastReading) prints only when the value changes, which makes random floating behavior easier to notice.
- delay(50); slows the loop slightly so Serial Monitor stays readable.
Expected Behaviour
With the jumper floating, Serial Monitor may show changes like:
GPIO27 reads HIGH GPIO27 reads LOW GPIO27 reads HIGH
When you touch the jumper to GND, it should settle on: GPIO27 reads LOW
When you touch the jumper to 3.3 V, it should settle on: GPIO27 reads HIGH
When you release it again, the value may drift or change unpredictably.
Experiment: Leave the Input Floating
Leave the loose end of the jumper wire in the air and move your hand near it without touching metal. You may see the value change. Touch the insulation of the wire, move it near the USB cable, or wave your hand nearby. The exact behavior will vary from desk to desk.
This happens because the loose wire acts a little like an antenna. It can pick up tiny electric fields from your body, the USB cable, nearby electronics, and the environment. Since GPIO27 is configured as INPUT with no pull-up or pull-down, there is no strong path forcing it to HIGH or LOW. The pin voltage can wander around the input threshold, so digitalRead() may report different values.
The fix is not to ignore the randomness. The fix is to design the input so it always has a default state. That is why Mission 04 teaches pull-up and pull-down resistors.
Common Mistakes
digitalRead() keeps changing between HIGH and LOW
GPIO27 is floating because nothing is driving it and no pull resistor is active.
GPIO reads HIGH when nothing is connected
An undriven high-impedance input is undefined, not automatically LOW.
Button input gives random values
The button may leave the GPIO open when released, so the ESP32 input floats.
Touching the wire changes the reading
Your body adds capacitive coupling to the loose high-impedance input.
A long jumper wire makes the problem worse
The longer loose wire acts more like an antenna and picks up more electrical noise.
The input becomes stable when connected to GND or 3.3 V
GND and 3.3 V force the pin below the LOW threshold or above the HIGH threshold.
The floating input seems stuck HIGH or LOW
Some boards, breadboards, or nearby wiring may weakly bias the pin by accident.
Touching 3.3 V does not read HIGH
The jumper may not be connected to GPIO27 or Serial Monitor may be showing old output.
Touching GND does not read LOW
The jumper may be in the wrong breadboard row or not making contact with GND.
Serial Monitor prints nothing
Wrong baud rate, wrong port, or the value has not changed since the last print.
I accidentally touched 3.3 V and GND together
The jumper bridged the power and ground pins.
Troubleshooting
Most ESP32 problems are wiring, power, library, or timing issues. Check these first.
digitalRead() keeps changing between HIGH and LOW
Likely cause: GPIO27 is floating because nothing is driving it and no pull resistor is active.
Fix: First prove the cause by touching the jumper to GND or 3.3 V. If the value becomes stable, the circuit needs a defined default state.
GPIO reads HIGH when nothing is connected
Likely cause: An undriven high-impedance input is undefined, not automatically LOW.
Fix: Do not treat the HIGH reading as a real button press. Add a pull-up, pull-down, or an active sensor output in the real circuit.
Button input gives random values
Likely cause: The button may leave the GPIO open when released, so the ESP32 input floats.
Fix: Check the released state before changing code. Mission 04 shows how INPUT_PULLUP or a pull-down resistor gives the button a stable default.
Touching the wire changes the reading
Likely cause: Your body adds capacitive coupling to the loose high-impedance input.
Fix: This is expected in the floating-pin experiment. Keep real input wiring short and define the default state.
A long jumper wire makes the problem worse
Likely cause: The longer loose wire acts more like an antenna and picks up more electrical noise.
Fix: Shorten the wire for the experiment, then use a pull resistor or supported internal pull mode in real projects.
The input becomes stable when connected to GND or 3.3 V
Likely cause: GND and 3.3 V force the pin below the LOW threshold or above the HIGH threshold.
Fix: That confirms the ESP32 and code are working. The unstable behavior came from the floating input, not from random software.
The floating input seems stuck HIGH or LOW
Likely cause: Some boards, breadboards, or nearby wiring may weakly bias the pin by accident.
Fix: Move the jumper, try a different safe GPIO such as GPIO26, and make sure the loose end is not touching a breadboard row connected to power or ground.
Touching 3.3 V does not read HIGH
Likely cause: The jumper may not be connected to GPIO27 or Serial Monitor may be showing old output.
Fix: Check the pin label, press reset, and confirm the sketch uses INPUT_PIN = 27.
Touching GND does not read LOW
Likely cause: The jumper may be in the wrong breadboard row or not making contact with GND.
Fix: Use the ESP32 GND pin directly and keep the jumper metal firmly connected for a moment.
Serial Monitor prints nothing
Likely cause: Wrong baud rate, wrong port, or the value has not changed since the last print.
Fix: Set Serial Monitor to 115200 baud, select the ESP32 port, and touch the jumper to GND then 3.3 V.
I accidentally touched 3.3 V and GND together
Likely cause: The jumper bridged the power and ground pins.
Fix: Unplug USB immediately, remove the short, inspect the board, then power up again only after the pins are separated.
Engineer Tip
A random input is usually not random software. It is usually an input pin without a defined voltage. Before changing code, ask what physical connection forces the pin HIGH or LOW.
Remember This Forever
A digital input must have a decision.
HIGH means the pin voltage is high enough to count as logic 1.
LOW means the pin voltage is low enough to count as logic 0.
digitalRead() reports the logic state; it does not measure exact voltage.
Floating means nobody is making the decision, so noise can decide for you.
Mini Challenge
No wrong answers — experiment and have fun!
- Count how many times the floating input changes in 10 seconds.
- Touch the jumper to GND for five seconds, then to 3.3 V for five seconds, and compare stability.
- Before touching the wire, predict whether it will read HIGH, LOW, or random.
- Write down why a button circuit needs a default state before Mission 04.
FAQs
What is a digital input on ESP32?
A digital input is a GPIO pin configured so the ESP32 reads whether the voltage on that pin looks like HIGH or LOW.
What voltage is HIGH on ESP32?
ESP32 uses 3.3 V logic. digitalRead() reports HIGH when the pin voltage is above the logic HIGH threshold and LOW when it is below the logic LOW threshold; it does not measure exact voltage.
Why does an unconnected ESP32 pin change randomly?
An unconnected input has no strong electrical reference. Tiny noise, nearby wires, your hand, long jumpers, or nearby electronics can nudge the pin above or below the input threshold.
Is a floating pin dangerous?
It usually does not damage the ESP32, but it makes your program unreliable. A floating input can trigger false button presses, false alarms, or unstable project behavior.
Do digital inputs measure exact voltage?
No. digitalRead() does not tell you the exact voltage. It only returns HIGH or LOW after the input circuit compares the pin voltage to logic thresholds.
Why did Mission 02 use INPUT_PULLUP?
INPUT_PULLUP gave the button pin a default HIGH value when the button was not pressed. Without that default, the pin could float.
What should I learn after floating pins?
The next concept is ESP32 pull-up and pull-down resistors. Mission 03 explains why pins float; Mission 04 shows the wiring patterns that give input pins a reliable default HIGH or default LOW state.