The Story
A small sensor can turn an ESP32 into a useful room monitor. Start by getting one dependable reading over USB, then add a screen or network connection once you know the sensor and wiring are working.
Background reading
Connect a BME280 to an ESP32 over I2C, install the Arduino library, and run a complete sketch that prints temperature, relative humidity, barometric pressure, and an approximate altitude estimate.
A small sensor can turn an ESP32 into a useful room monitor. Start by getting one dependable reading over USB, then add a screen or network connection once you know the sensor and wiring are working.
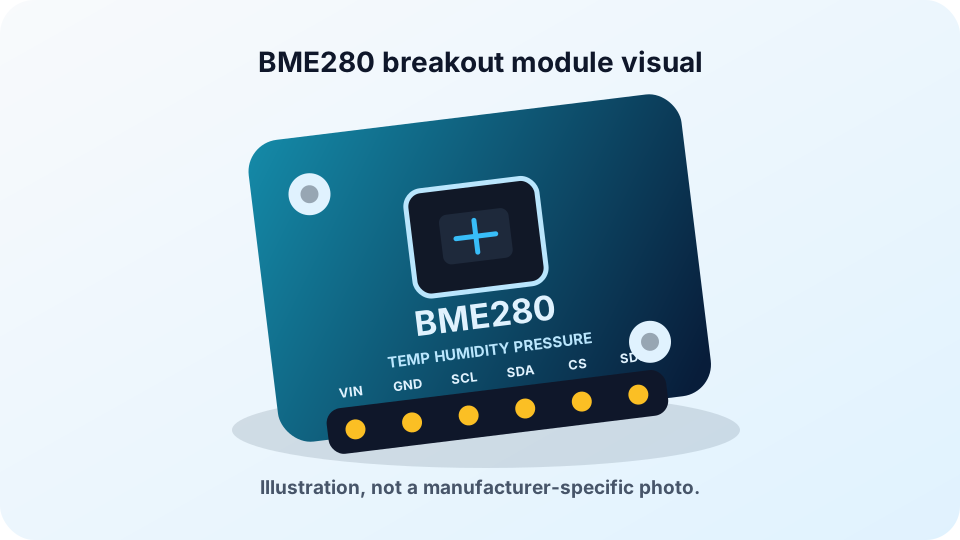
The BME280 is a tiny chip that checks how warm, humid, and pressurized the air is. The ESP32 asks it for these numbers over two signal wires and can print them on your computer.
Author: Abdul Mubeen and the ESP32 Engine editorial team. Last updated: 2026-09-28. Reviewed: educational accuracy and beginner safety. Level: Beginner to Intermediate. Estimated time: 12 min read.
This guide is written for learning and bench prototyping. Check the testing notes before adapting the circuit to different boards, batteries, relays, motors, or outdoor hardware.
The BME280 is a digital environmental sensor that reports three measurements:
Altitude is not a fourth direct measurement. A library can estimate it from pressure and a sea-level pressure reference. The estimate shifts with weather and with the reference value, so it is useful for a rough elevation or trend rather than a GPS replacement. The BME280 component reference covers the module as a component; this page focuses on connecting it to an ESP32 and using its readings.
Both can report temperature and relative humidity. The BME280 adds barometric pressure, which enables pressure tracking and approximate pressure-based altitude. A DHT22 is a reasonable fit when temperature and humidity are all you need; choose a BME280 when pressure is useful. See the DHT22 reference for its component details.
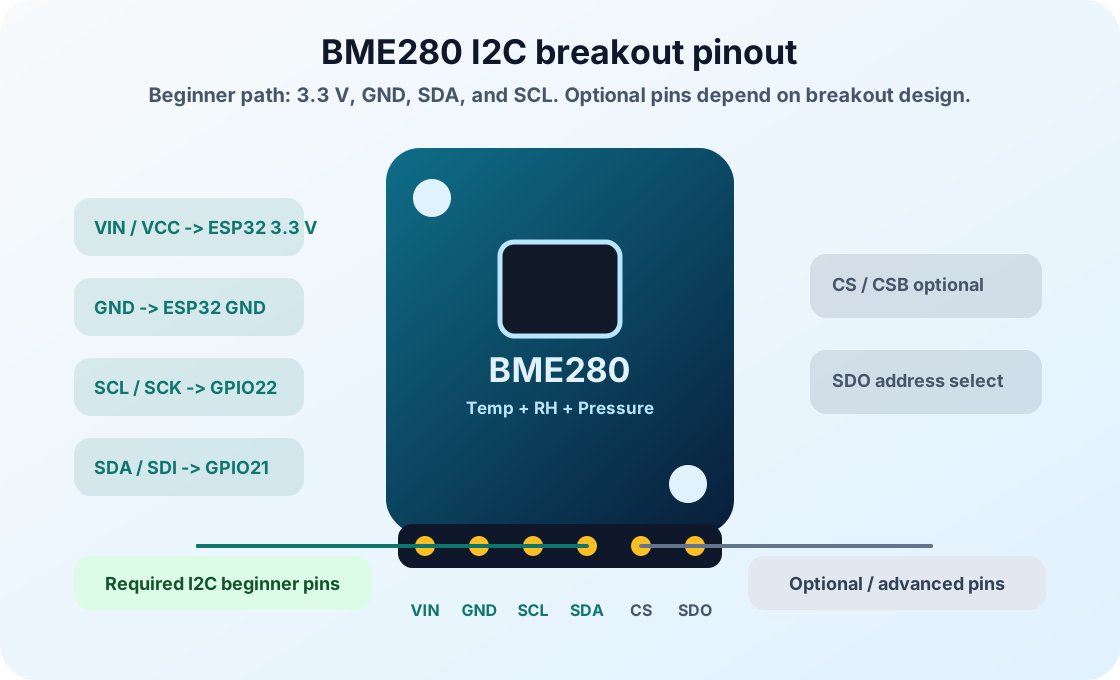
The BME280 chip supports both I2C and SPI. I2C is the simplest starting point for an ESP32: connect power and ground plus SDA and SCL, and the same two signal wires can be shared with other I2C devices when their addresses do not conflict. SPI uses clock, data-in, data-out, and chip-select signals; it can be useful when a project already uses SPI or needs that interface. This guide uses I2C. For a bus introduction, see I2C communication with ESP32.
Breakout boards do not all use identical labels or power circuitry. The BME280 integrated circuit itself has a 1.71–3.6 V supply range, but the voltage accepted by a breakout's VIN/VCC pin depends on that board's design. Check the documentation for your exact module, and make sure its I2C logic levels are compatible with the ESP32. Do not assume an unspecified breakout is 5 V tolerant.
| BME280 breakout pin | Connect for I2C | Notes |
|---|---|---|
| VIN or VCC | ESP32 3V3 when the breakout documentation permits it | Use the module's documented supply range. A bare sensor and a breakout board can have different electrical requirements. |
| GND | ESP32 GND | Both devices need a common ground. |
| SDA or SDI | ESP32 SDA | Some breakouts label the I2C data pin SDI; connect SDA/SDI to ESP32 SDA. This example uses GPIO21 on a common original ESP32 DevKit. |
| SCL or SCK | ESP32 SCL | Some breakouts label the I2C clock pin SCK; connect SCL/SCK to ESP32 SCL. This example uses GPIO22 on a common original ESP32 DevKit. |
| CS or CSB | Not used for this I2C example | Chip-select is used for SPI. Board instructions may specify how to hold/configure it for I2C. |
| SDO | Not used as data for this I2C example | On many designs this pin selects the I2C address; see the board documentation. In SPI mode it is data-out. |
In I2C mode, some boards label the shared pins by their SPI names, such as SCK for SCL and SDI for SDA. Use the markings and pinout for your exact breakout. The BME280 pinout illustration is a visual reference; the board manufacturer's documentation remains authoritative for electrical details.
For the common original ESP32 DevKit pin mapping used by the sketch below, wire the BME280 breakout as follows. If you have a different ESP32 family board, confirm its usable I2C pins and change the two constants in the code.
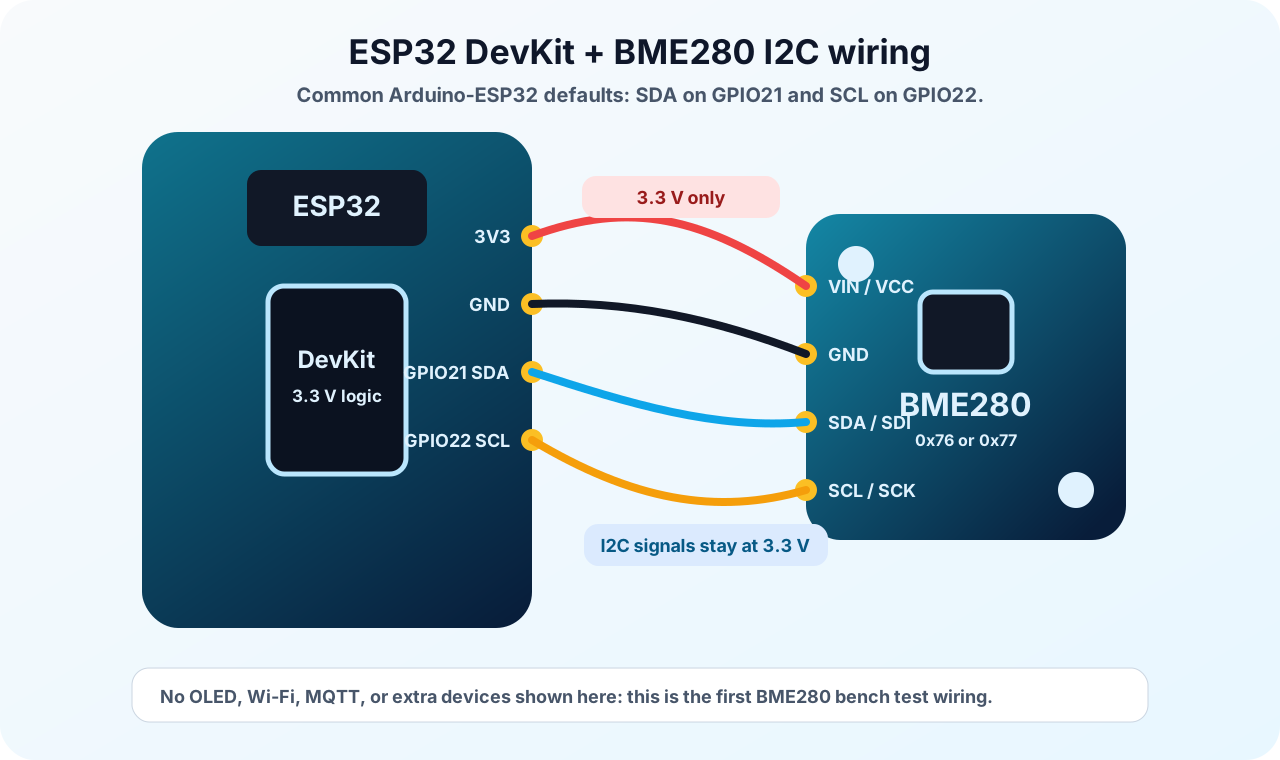
For ESP32 boards where default I2C pins differ, the Arduino-ESP32 Wire.begin(sda, scl) call in this example sets the pins explicitly. Choose appropriate pins for your exact board.
The sketch creates an Adafruit BME280 object, starts I2C on the selected pins, and calls begin() with each common address in turn. If initialization succeeds, it reads the four displayed values once per second.
    #include <Wire.h>
    #include <Adafruit_BME280.h>

    // Example pins for a common original ESP32 DevKit. Adjust for your board.
    const int I2C_SDA = 21;
    const int I2C_SCL = 22;

    // Replace with a suitable local sea-level pressure reference for better altitude estimates.
    const float SEA_LEVEL_PRESSURE_HPA = 1013.25F;

    Adafruit_BME280 bme;

    void setup() {
      Serial.begin(115200);
      delay(100);

      Wire.begin(I2C_SDA, I2C_SCL);

      bool sensorFound = bme.begin(0x76, &Wire);
      if (!sensorFound) {
        sensorFound = bme.begin(0x77, &Wire);
      }

      if (!sensorFound) {
        Serial.println("BME280 not found. Check wiring and I2C address.");
        while (true) {
          delay(1000);
        }
      }

      Serial.println("BME280 ready");
    }

    void loop() {
      const float temperatureC = bme.readTemperature();
      const float humidityPercent = bme.readHumidity();
      const float pressureHpa = bme.readPressure() / 100.0F;
      const float altitudeMeters = bme.readAltitude(SEA_LEVEL_PRESSURE_HPA);

      Serial.print("Temperature: ");
      Serial.print(temperatureC, 2);
      Serial.println(" °C");

      Serial.print("Humidity: ");
      Serial.print(humidityPercent, 2);
      Serial.println(" %");

      Serial.print("Pressure: ");
      Serial.print(pressureHpa, 2);
      Serial.println(" hPa");

      Serial.print("Approx. altitude: ");
      Serial.print(altitudeMeters, 1);
      Serial.println(" m");
      Serial.println();

      delay(1000);
}Wire.begin(): select SDA and SCL for the board mapping in this example. If using a different ESP32, set pins appropriate to that board.begin() attempts: the sketch checks 0x76, then 0x77. It stops with a clear serial message if neither initializes.readTemperature() returns degrees Celsius and readHumidity() returns relative humidity percent.readPressure() returns pascals; dividing by 100 converts the value to hPa.readAltitude() uses the pressure reading and the supplied sea-level reference. The example's 1013.25 hPa is a standard reference starting point, not a live local weather reading.Temperature appears in °C, humidity in percent, pressure in hPa, and altitude in meters. Pressure is the sensor's local barometric pressure. Weather services often report pressure adjusted to sea level, so those numbers may differ. Change SEA_LEVEL_PRESSURE_HPA to a suitable local sea-level pressure reference when you want the altitude estimate to better match a known elevation.
For steadier room measurements, let the sensor settle and keep it away from heat produced by the ESP32 regulator, USB interface, sunlight, or your breath. Compare trends under similar conditions rather than expecting two uncalibrated devices in different locations to match exactly.
Two common BME280 I2C addresses are 0x76 and 0x77. The address is selected by the sensor's SDO pin or a breakout-specific address pad/jumper. The exact jumper behavior depends on the board, so consult its documentation. This sketch tries both addresses, but it cannot fix a wiring, power, or device-identification problem.
If neither address responds, run an I2C scanner with the same SDA and SCL pins, check the board's address setting, and verify that the module is actually a BME280. A BMP280-shaped breakout may look similar but does not include humidity sensing.
Wire.begin() values.The BME280 measures temperature, relative humidity, and barometric pressure. Altitude is estimated from pressure and a sea-level pressure reference; the sensor does not measure altitude directly.
Common BME280 breakout configurations use 0x76 or 0x77. The address depends on the sensor board's SDO pin or address-jumper configuration, so check its documentation or scan the I2C bus instead of assuming one address for every board.
For a common original ESP32 DevKit, this example uses GPIO21 for SDA and GPIO22 for SCL. Other ESP32 boards may have different defaults; choose available pins for your board and set them in Wire.begin().
They both measure temperature and relative humidity. The BME280 also measures barometric pressure, which supports pressure trends and approximate pressure-based altitude. Choose based on the readings and interface your project needs.
Check that the module actually contains a BME280 and that the library initialized the expected device. Some visually similar pressure-sensor modules, such as BMP280 modules, do not provide humidity readings.
Not necessarily. The library estimates altitude from pressure and the sea-level pressure value supplied to the sketch. Local weather changes, elevation, and the reference pressure affect the result, so treat it as approximate.
Start with the I2C wiring and Serial Monitor sketch, confirm that the address and readings are sensible, and only then add a display, logging, or network publishing. The BME280 reference page has the concise component details; this guide is the practical ESP32 build path.